In earlier days most of the restorative treatments we do were due to caries or dental decay and the term Cavity was used to describe a carious lesion in a tooth that had progressed to the point where the tooth structure had been destroyed.
The cavitated tooth was called a Cavity and the affected tooth was repaired, the cutting or preparation of the remaining tooth was called Cavity preparation.
According to Sturdevant, it is defined as, the mechanical alteration of the defective, injured, or diseased tooth to be best receive a restorative material that will reestablish a healthy state for the tooth, including esthetic corrections where indicated along with normal form and function.
Contents
- 1 Terminology in Cavity Preparation:
- 2 Cavosurface angle and Cavosurface margin:
- 3 Classification of Cavity Preparation:
- 4 GV Black Classification:
- 5 Stages and Steps of Cavity Preparation:
- 6 Outline Form And Initial Depth:
- 7 Primary Resistance Form:
- 8 Primary Retention Form
- 9 Convenience form:
- 10 Removal of any remaining infected dentin or old restoration:
- 11 Pulp Protection:
- 12 Secondary Resistance and Retention Form:
- 13 Finishing of External Wall:
- 14 Final procedure: Cleaning, Inspecting, and Sealing:
- 15 Summary
Terminology in Cavity Preparation:
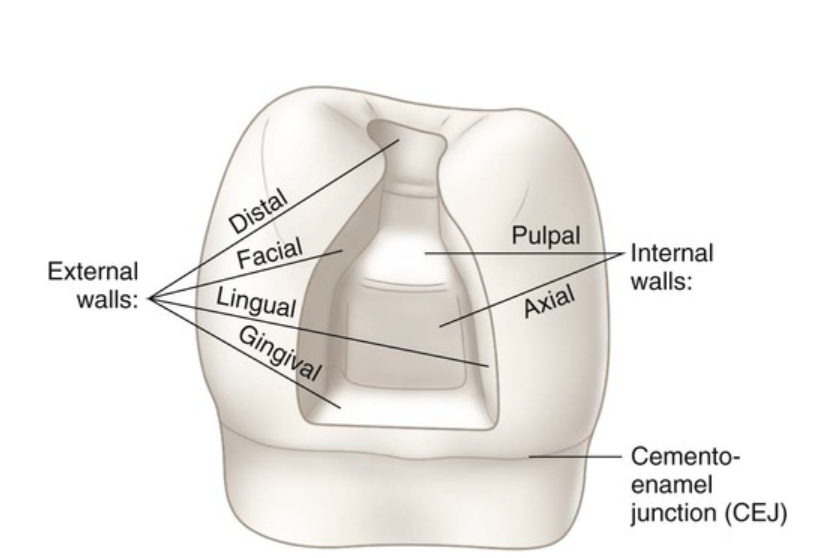
| Internal wall | An internal wall is a prepared surface that does not extend to the external tooth surface. |
| Axial wall | An axial wall is an internal wall parallel with the long axis of the tooth. |
| Pulpal wall | A pulpal wall is an internal wall that is both perpendicular to the long axis and occlusal of the pulp. |
| External wall | An external wall is a prepared surface that extend to the external tooth surface. |
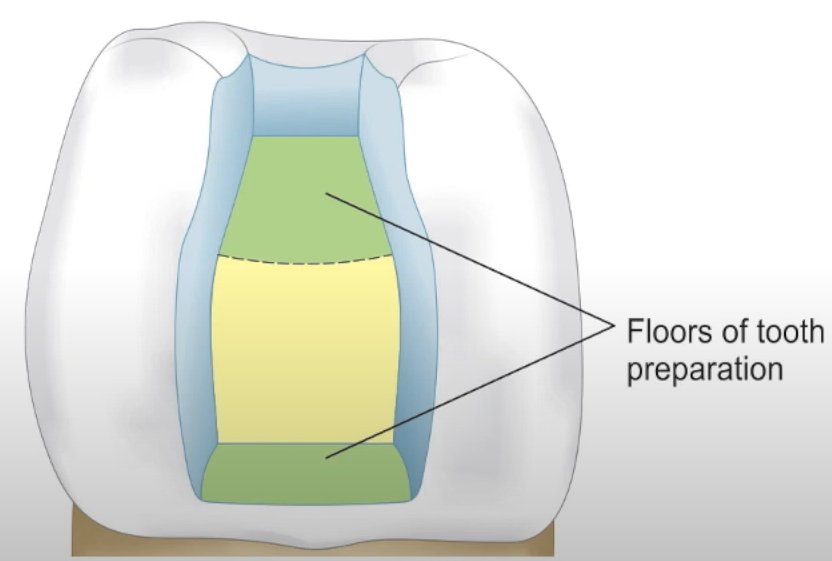
| FLoor | A floor is a prepared wall that is reasonably flat and perpendicular to those occlusal forces that are directed occluso gingivally. |
| Enamel wall | The enamel wall is that portion of prepared external wall consisting of enamel. |
| Dentinal wall | The dentinal wall is that portion of a prepared external wall consisting of dentin, in which mechanical retension features may be located. |
| Line Angle |
A line angle is the junction of two plane surfaces of different orientations along a line. An internal line angle: Line angle whose apex points into the tooth. An external line: It is a line angle whose apex points away from the tooth. Number of line angles:
|
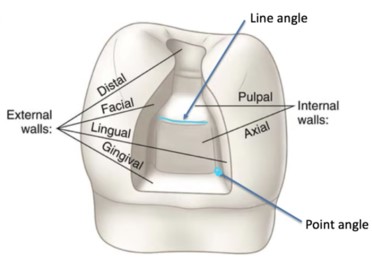
| Point Angle | A point angle is the junction of three plane surfaces of different orientations.Number of point angles:
|
| Type of tooth preparation | Line angle | Point angle |
|---|---|---|
| Class I | 8 | 4 |
| Class II | 11 | 6 |
| Class III | 6 | 3 |
| Class IV | 11 | 6 |
| Class V | 8 | 4 |
Cavosurface angle and Cavosurface margin:
- The cavosurface angle is the angle of tooth structure formed by the junction of a prepared wall and the external surface of the tooth. The actual junction is referred to as the cavosurface margin.
- The cavosurface angle differs with the location of the tooth, the direction of the enamel rods on the prepared wall or the type of restorative material to be used.
Classification of Cavity Preparation:
- Simple: if only one tooth surface is involved.
- Compound: if two surfaces are involved.
- Complex: if a preparation involves three surfaces.
GV Black Classification:

| Remove all defects and provide necessary protection to the pulp. |
|---|
| Extend the restoration as conservatively possible. |
| Form the tooth preparation so that under the force of mastication the tooth or the restoration or both will not fracture and the restoration will not be displaced |
| Allow for the esthetic and functional placement of a restorative material. |
If you need you can go through my detailed article about GV Black’s Classification too.
Stages and Steps of Cavity Preparation:
- INITIAL TOOTH PREPARATION (FIRST STAGE OF TOOTH PREPARATION).
- Outline form and initial depth.
- Primary resistance form.
- Primary retention form.
- Convenience form.
2. FINAL TOOTH PREPARATION (SECOND STAGE OF TOOTH PREPARATION).
- Removal of any remaining infected dentin or old restoration (if indicated).
- Pulp protection.
- Secondary resistance and retention form.
- Finishing of external walls.
- Final procedure: cleaning, inspecting, and sealing.
Now I will discuss in brief about steps of cavity preparation.
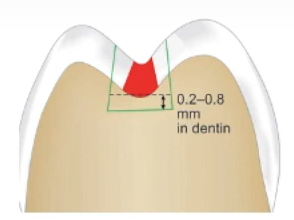
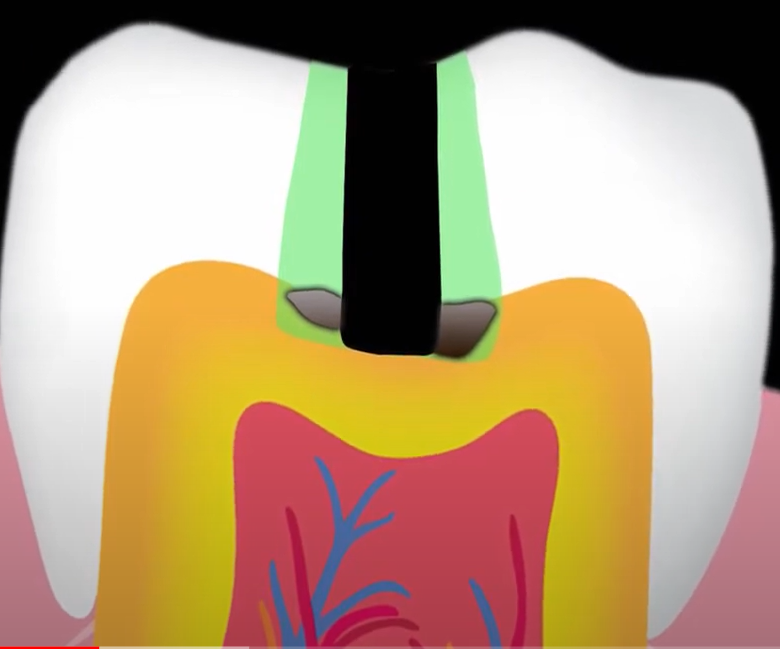
Outline Form And Initial Depth:
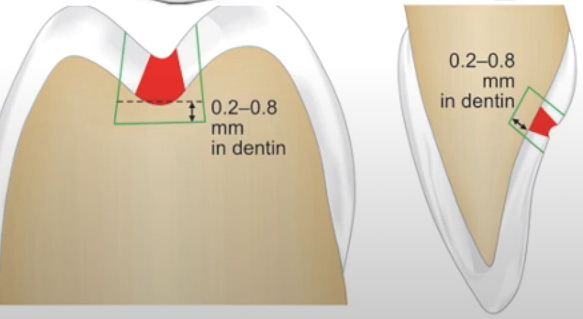
- Outline form is defined as ” placing the preparation margins in the position they will occupy in the final tooth preparation except for finishing enamel walls and margins”.
- It also includes preparing the initial depth of 0.2 to 0.8 mm into the dentin.
Principles of Outline Form
- Removal of all weakened and friable tooth structures.
- Remove all undermined enamel.
- Incorporate all faults in preparation.
- Place all margins of preparation in a position to afford good finishing of the restoration.
Features of outline form
- It should preserve the cuspal strength, so we are not supposed to cut the tooth structure as we like. We should preserve the cusp.
- Preserving the strength of the marginal ridge means we need to preserve the marginal ridge because the marginal area is the place where we bear the occlusal forces.

- Minimizing the buccolingual extension.
- If the distance between two faults is less than 0.5mm then we need to connect them.
- The depth of the preparation should be limited to 0.2 to 0.8mm to dentin.
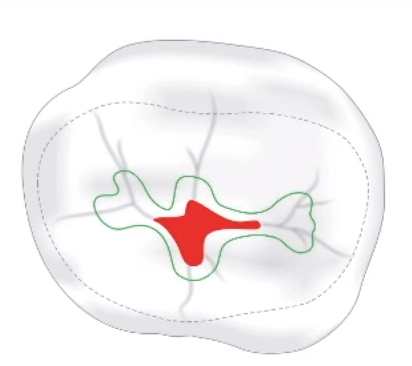
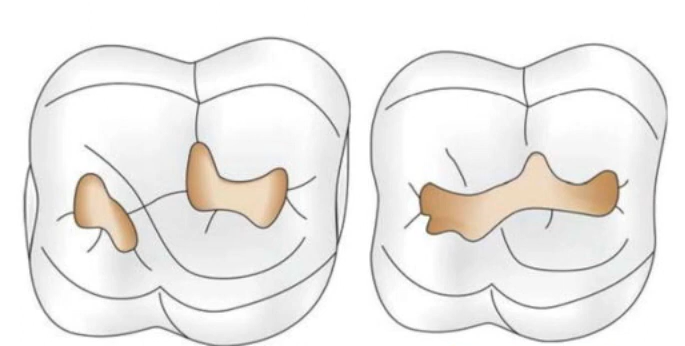
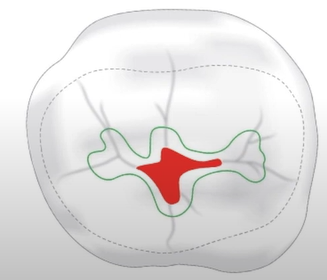
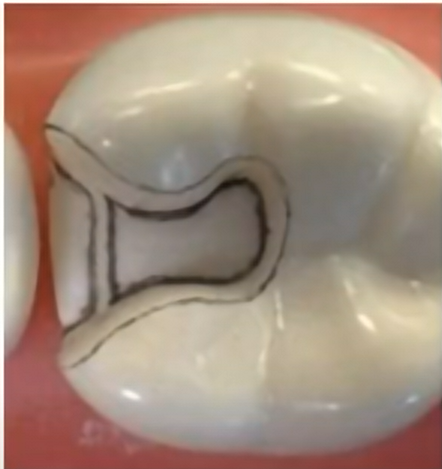
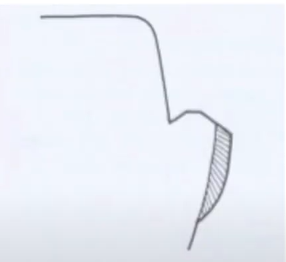
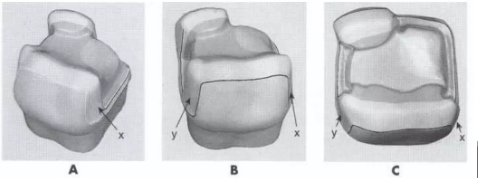
Outline form for pit and fissure lesions.
- First, we need to remove all the defective areas and extend the preparation margin to the healthy tooth structure. As shown in the figure instead of giving a straight outline form you prepare in such a way that we can preserve the cusp. This is called circumventing the cusps.

- Remove all unsupported enamel rods or weakened enamel margins.
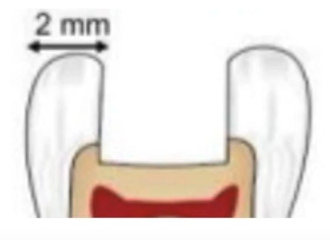
- Limit the depth of the preparation to 0.2mm into the dentin, total depth can be 1.5 to 2mm.
- Avoid preparation margins in high-stress areas like cuspal eminences, and marginal ridges. Because constant loading forces on the restoration may result in restoration failure.
- Involve all the pits and fissures which cannot be managed by enameloplasty.
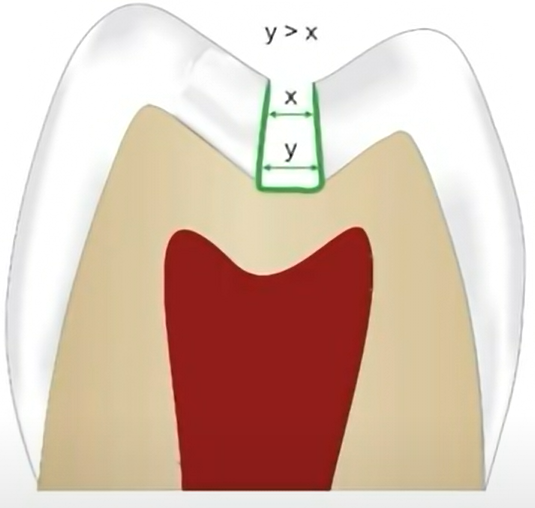
- The width of the Isthmus should be one-fourth of the intersuspal distance.
- Extend the outline form to have a convenient form it means don’t make it too narrow to fill the restoration and work up with the instruments.
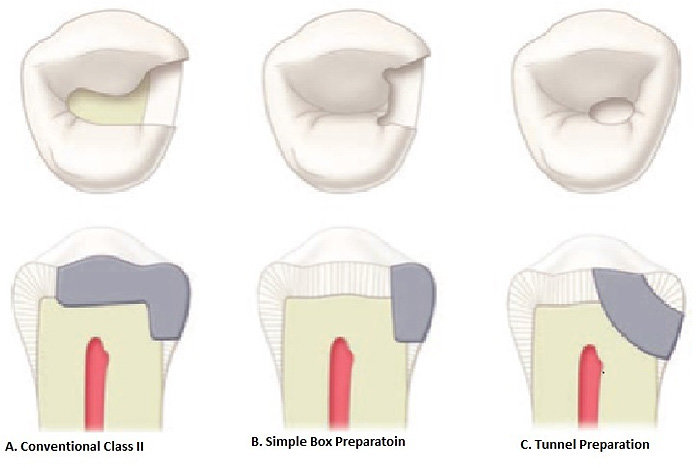
Outline form for Class II Cavity Preparation:
- The preparation margins on sound tooth structure.
- The depth of the axial wall is 0.2-0.8 mm into the dentin.
- The axial wall should be parallel to the external surface of the tooth.
- The gingival seat should be apical to the contact and 0.5mm of clearance from the adjacent tooth.
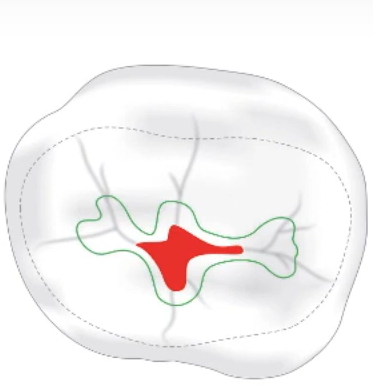
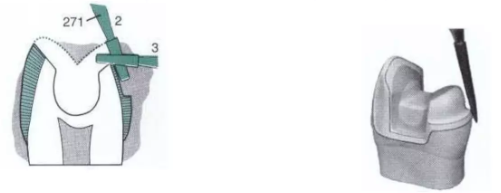
Enameloplasty
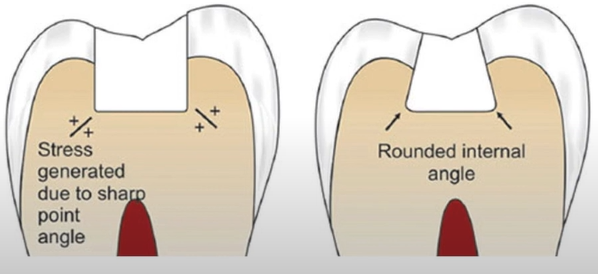
- Removal of sharp and irregular enamel margins by “rounding or saucering” them and converting them into smooth surfaces making cleansible areas. Indicated when ” caries involves less than one-third thickness of enamel.
- Enameloplasty does not extend the outline form. Here fissure is made into the saucer-shaped area with mild removal of enamel.
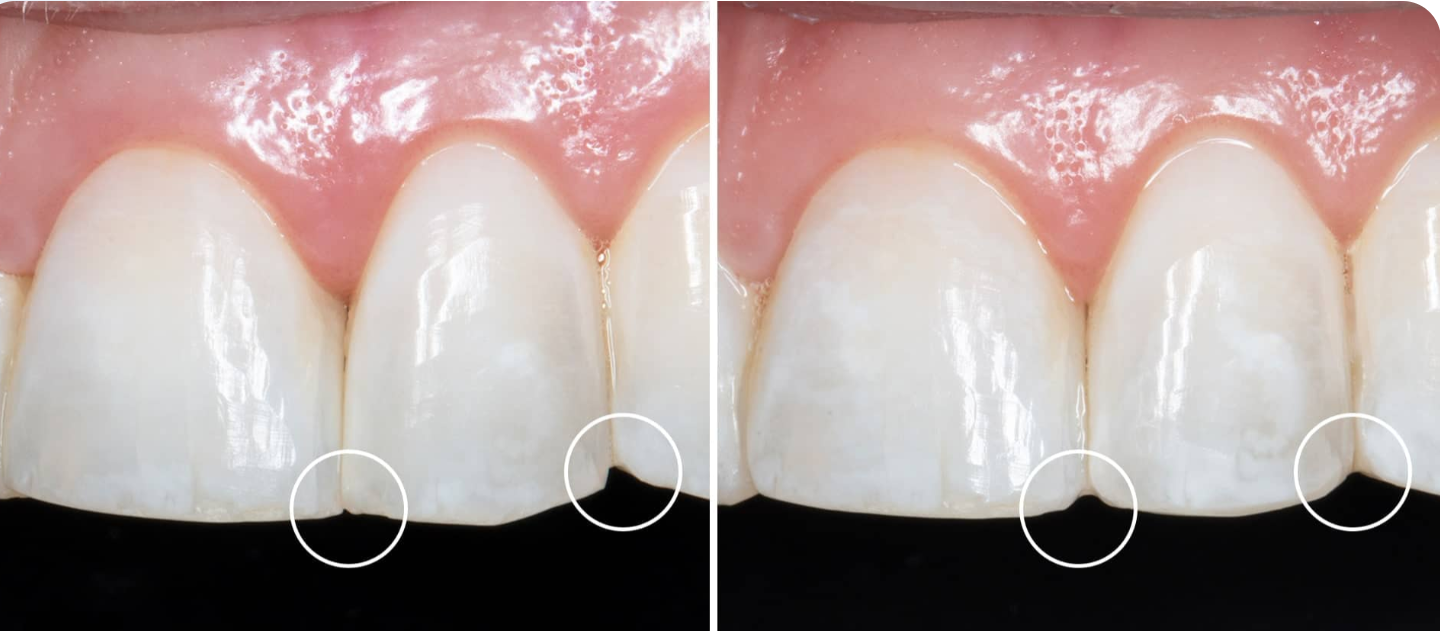
In the first image, you can see sharp edges in the rounded area. In the second image, the sharp edges of the enamel have been removed by rounding off and converting them into a smooth surface.
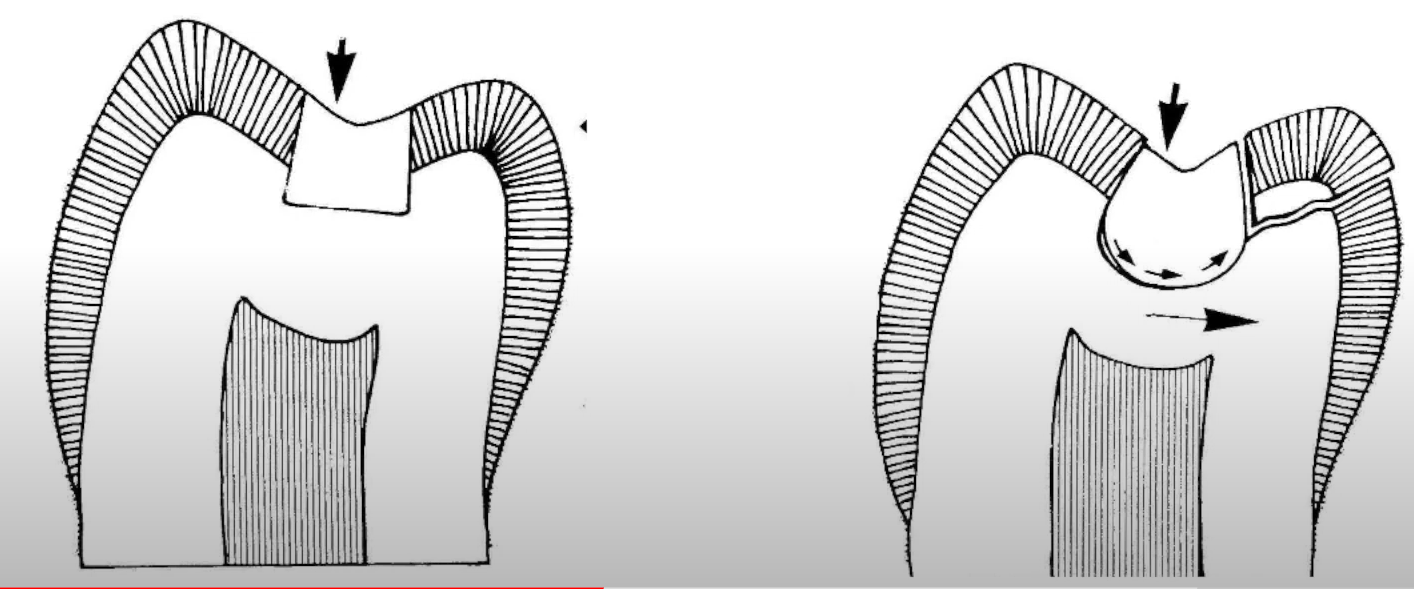
Primary Resistance Form:
Primary resistance form is the shape and placement of preparation walls to best enable both the tooth and restoration to withstand without fracture the stresses of masticatory forces delivered principally along the long axis of the tooth.
It means we need to prepare the cavity floor and angle in such a way that it will prevent the fracture of both the tooth and restorative material during occlusal forces.
Features of Primary Resistance Form:
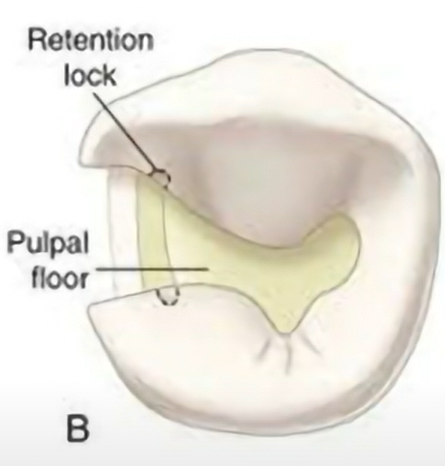
- Box-shaped or Mortise form of preparation with flat pulpal and gingival floor.
This means a tooth will experience many types of forces such as compressive forces, tensile forces, etc. To resist such forces the floor should be made perpendicular to the long axis of the tooth.
The walls of the preparation should be parallel to the preparation. This helps to prevent the stresses acting on the tooth and restoration and increases the primary resistance form of the tooth.
A preparation with proper walls, floor, line, and point angles helps to prevent the micro-movement of the restorative material within the tooth.
- There should be an adequate bulk of restorative material. It means the greater the bulk of the material lesser the forces and the lesser the chances of fracture of the tooth.
- Extension of the external wall should be prevented to have enough marginal ridges.

- Inclusion of weakened tooth structure. It says we need to include the weakened tooth structure in preparation which prevents the fracture of restoration.
- Rounding of the internal line angle. It means if there are any sharp points in the preparation the stresses will get concentrated but if we round it off then it will minimize the fracture of the restoration.
- Consideration of cusp capping.
So let me revise the resistance form, first The floor should be flat and the walls should be parallel to each other. There should be an adequate bulk of the restoration (1.5 to 2mm). The cavosurface angle should be 90 degrees. Rounded line and point angles. Inclusion of weakened tooth structure and consideration of cusp capping.
Primary Retention Form
Primary retention form is the form, shape, and configuration of the tooth preparation that resists the displacement or removal of restoration from the preparation under lifting and tipping masticatory forces.
- Convergent walls: We know in amalgam restoration amalgam won’t bond chemically or micromechanical to the tooth structure. Its retention depends on the cavity design. So we need to make the cavity convergent.
- Occlusal dovetail: In class II preparation there are only three walls. So retentive feature is required to keep the restoration. A dovetail is made on the occlusal part of the restoration.
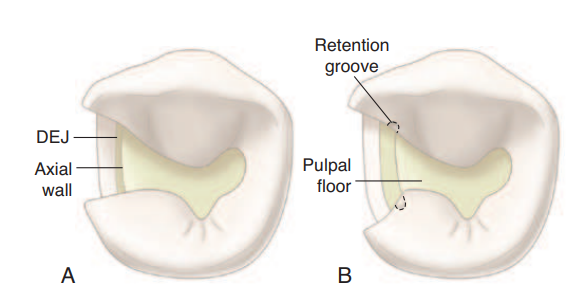
- Grooves/lock: Retentive grooves can be made with a small round bur axiofacial and axiolingual line angle to prevent the restoration out of the proximal box.
Primary Retention for Cast Metal Restoration:
In cast metal restoration retention can be achieved by parallel walls.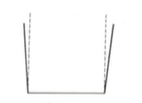
Occlusal dovetail which prevents the horizontal displacement of the cast metal restoration.

The reverse bevel prevents the tipping movement of the cast metal restoration and proximal movements.

Primary Retention in Composite:
We know in composite the primary retention is attained by micromechanical bonding between the etched and the composite resin restoration. By providing the enamel bevel in preparation we can increase retention.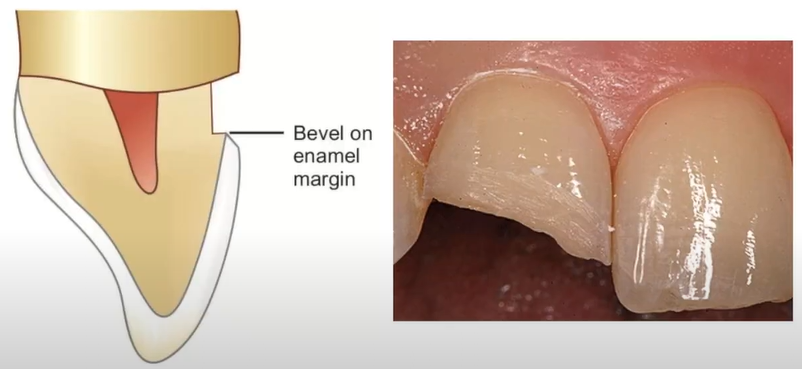
Primary Retention Form in Direct Filling Gold:
In Direct filling walls, the walls are kept convergent and sharp internal lines and point angles. The sharp line and point angles help to prevent the micromovement of the restoration and provide retention.
Convenience form:
The convenience form of cavity preparation is the shape or form that provides adequate observation, accessibility, and ease in the preparation and restoration of the tooth.
When there are severe caries destruction it may necessitate the extension of distal, mesial, and facial or lingual walls so as to gain adequate access to deeper areas of the preparation.
Extension of the proximal walls so as to obtain clearance with an adjacent proximal surface may afford better access for the finishing of preparation walls the placement of the matrix and the finishing of restoration margins.
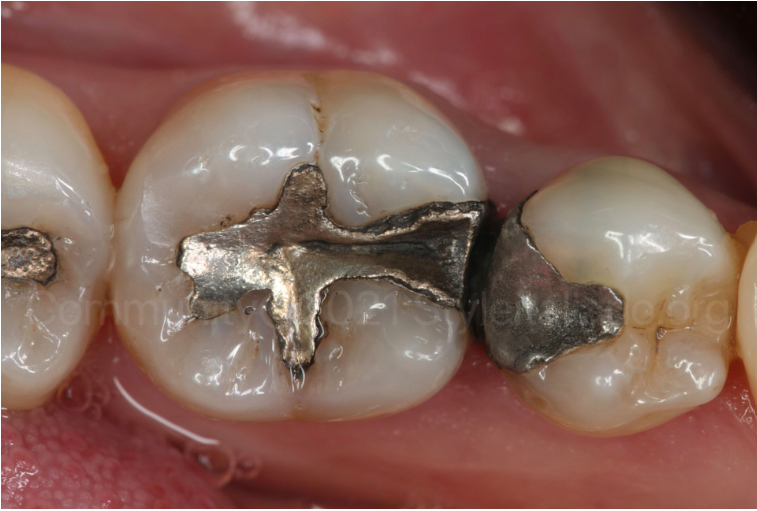
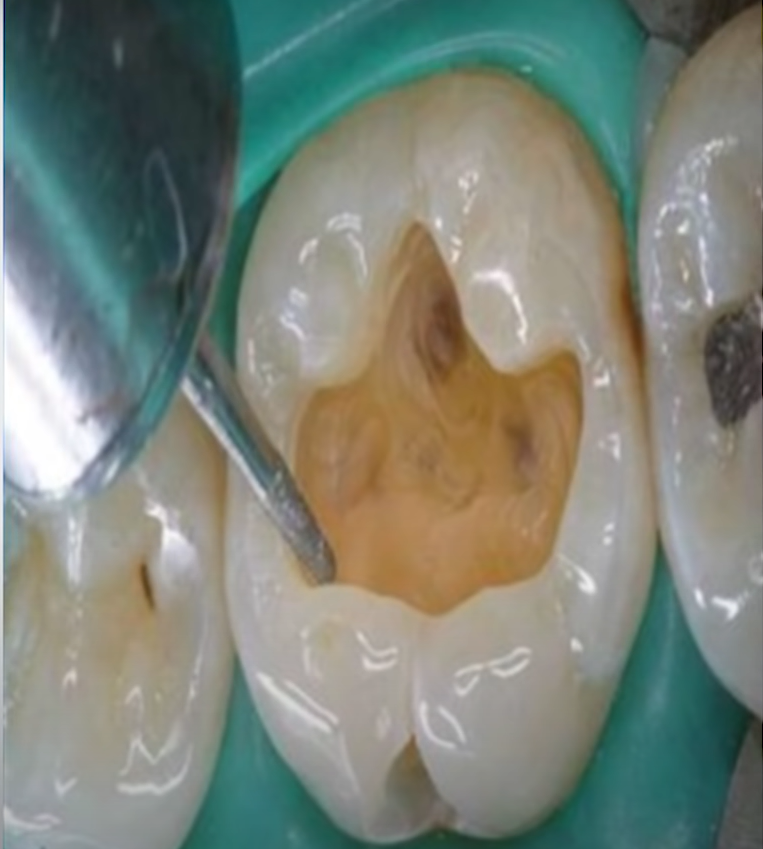
Removal of any remaining infected dentin or old restoration:
- Once the caries lesion has been exposed careful pulpal or axial extension is accomplished so as to remove the defective restorative material or any soft dentin.
- Old restorative material may remain on the pulpal or the axial walls after initial tooth preparation. It has to be removed if any of the following conditions persist such as:
- The old restoration negatively affects the aesthetic of the patient.
- Radiographic evidence indicates caries lesion development under the old material and clinical evaluation confirms the radiographic interpretation.
- The tooth pulp was symptomatic previously.
- The dentin along the periphery of the remaining old restoration material.
- Retention of the existing material is compromised and the material is easily dislodged.
Pulp Protection:
- Protection of pulp is very important to maintain the vitality of the tooth.
Different kinds of pulp protection are:
- Thermal protection is protection from heat after restoration.
- Mechanical protection is the protection from mechanical trauma.
- Chemical protection is protection from the ions or microleakage.
- Electrical protection.
Pulp protective agents are:
- Cavity sealers: Varnish and Resin bonding agents.
- Liners.
- Bases.

Secondary Resistance and Retention Form:
- Secondary retention can be achieved in two ways, one is by Mechanical preparation and Treatment of the preparation.
Mechanical Preparation.
- Mechanical preparation can be given by cutting the tooth structure that is by giving Grooves and slots.
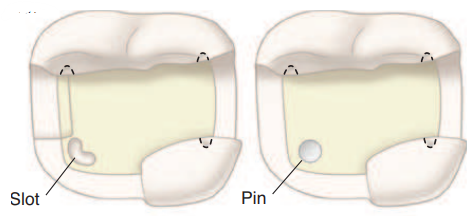
- It is called retention locks when we give for amalgam and retention grooves when we give for composite. They are given with the help of 169l bur.
- For amalgam, we give Reverse bevel, and it’s given by GMT.
- For cast restoration, we give Box preparation. It’s given in the periphery where there is enough amount of restoration.
- Next, we have the slot. The slot and the box look similar but the slot doesn’t have a sharp line angle and point angle.
- Retention coves are given in the amalgam restoration and not in the cast restoration.

- Pins are used in case of large restoration. It is given in both direct and indirect restoration. Various studies have shown that even though pins give retention it decreases the strength of the tooth. When we put a pin into the dentin with a lot of friction it may damage the tooth structure. When we place multiple pins place them non-parallel to each other.
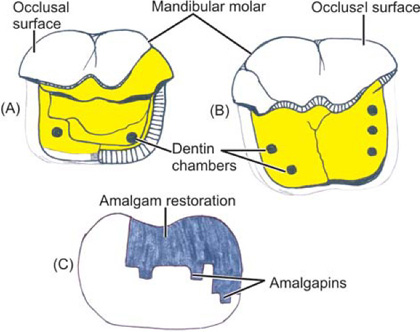
- If you want to overcome this use Amalgapin.
- Apart from all these, we have Skirts and collars which are meant for cast restoration.
Treatment Preparation.
- The other one is by applying bonding agents (we are not cutting any tooth structure).
Finishing of External Wall:
- Proper finishing of the external walls allows the creation of an optimal marginal junction between the restorative material and the tooth structure. Enamel rods are oriented perpendicular to the external tooth surface. Enamel walls that form 90 90-degree angles with the cavosurface may be considered to have dentinal support and to be strong.
- Enamel rods that don’t run interrupting the preparation margin to dentin tend to split off leaving a V-shaped ditch along the cavosurface margin area of the restoration.
- Beveling enamel margins in composite preparation are indicated primarily for large restorations that have increased retention needs and insufficient amount of prepared enamel for proper retention form of the preparation.
- The use of a beveled margin is useful for the inclusion of minor surface defects just adjacent to the cavosurface margins as well as affords enhanced marginal sealing.
Final procedure: Cleaning, Inspecting, and Sealing:
- Cleaning of the tooth preparation involves the use of an air/water syringe to remove visible debris with water and then excess moisture with a few light bursts of air. It is important not to dehydrate the tooth by overuse of air as this may damage the odontoblast associated with the desiccated tubules.
- Complete debridement allows careful inspection of the preparation so as to ensure adherence to all principles of preparation design.
Summary
We need to prepare in such a way that it should be done conservatively by protecting the natural tooth structure during preparation. Tooth preparation is done through various factors. Preparation design is implemented to provide subsequent restoration.
If the cavity has gone deep then pulp will get exposed and the tooth might go for Root Canal Treatment.
I had tried my best to include all the information about steps in cavity preparation.
Got any questions?
If you are having any questions, then feel free to comment it below and I will try my best to revert back as soon as possible.
One Small Request!
If you think this article is worth reading and informative, then please do share it with your friends or other dental students.